


edison 初期設定
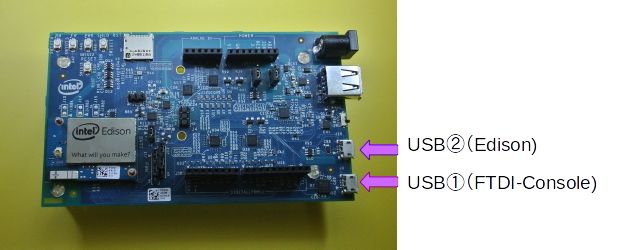
2つのUSBコネクタには機能が違いますのでご紹介します。
- ①のUSBコネクタはEdisonにアクセスするためのコンソール専用USBコネクタになります。 j3
- ②のUSBコネクタは、Edison本体が持つUSB機能に接続するためのコネクタになります。 j16
この、Edison本体が持つUSB機能ですが、EdisonにはUSBスレーブ(例えばPCが親でEdisonが子)と、 USBホスト(Edisonが親でUSBメモリが子)の両方の機能をもっております。
Edisonのブレークアウトボードでは、①(①ではなく、②でしょう)のUSB端子でUSBスレーブ機能とUSBホスト機能両方を実現しています。 また、Arduinoベースボードでは、番号が振っていないもうひとつのUSBーAのコネクタでUSBホストの機能を利用できます。
ただし、EdisonはUSBホストとUSBスレーブを同時に使用することが出来ない為、 通常時はUSBスレーブと動き、スイッチを切り替えたりケーブルを変えたりするとUSBホストになります。 USBホストとして使う方法は後述でまとめますので、もう少々お待ちください。
1. Edison をホストコンピューターにつないでみる
まず,Intel Edison を買ったら,yocto linux をアップデートするか,ubilinux 等のシステムの最新版を入れなおさないといけない。 そのためにはホストとなるコンピューターに Edison をつながなければならない。 今回私が購入した Intel 製の Arduino Expansion Board には,
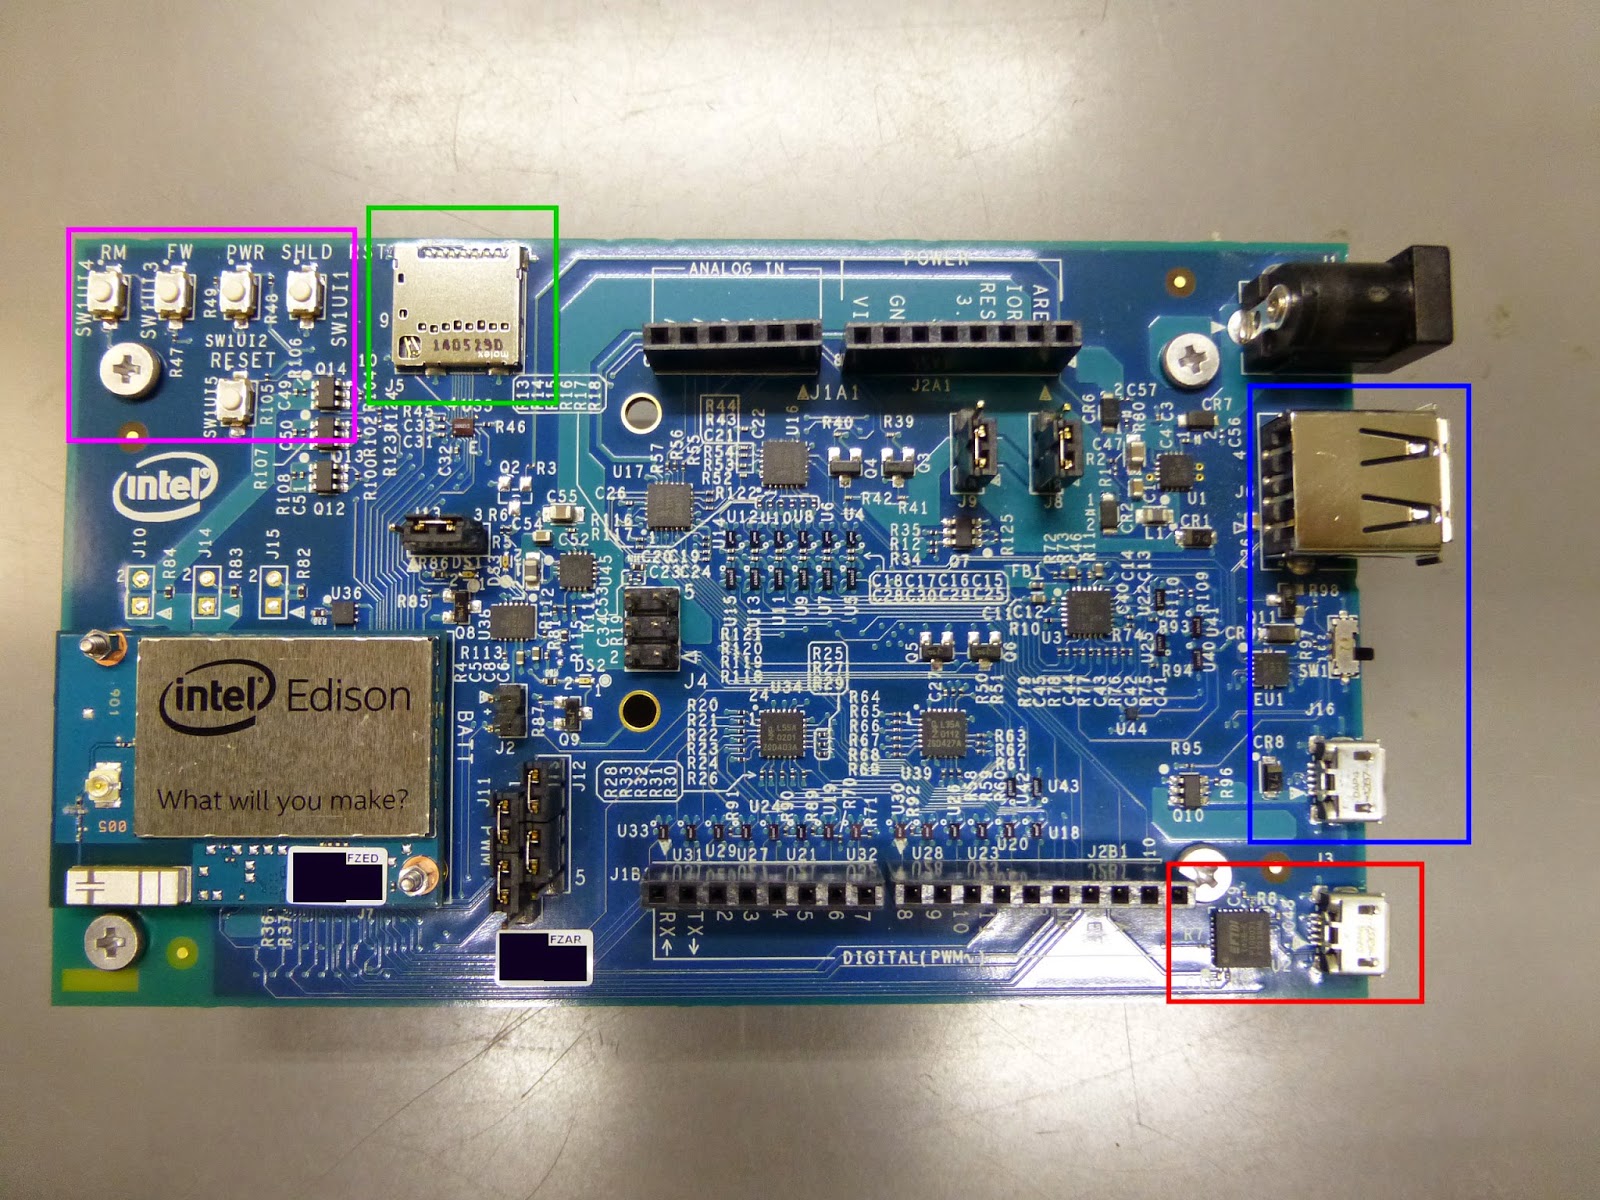
2個の micro USB と1個の USB Aコネクターが付いている。
USB Aコネクターは一方の micro USB とスイッチで切替えて,USB (USB type A)か micro USB (type B)のどちらかを選ぶ。
つまり USB 接続に関しては micro USB が2個ある,と思っておけば良い。
また,電源入力として,通常の電源コネクターとジャンバー形式の電源入力,充電池からの入力が備わっている。
しかし,一方の micro USB (下記のJ16) をホストコンピューターにつなげば,そこから 5V が供給されて Edison は起動できる。
まぁ,なにはともあれ,これらをつながないと Edison をいじる事はできない。
(どこかに書いてあったが,WiFi が働くと電流をくうので,できれば USB からの電源供給ではなく,電源端子や LiPo バッテリーから電源を取るのがいいらしい)
まず micro USB についてみてみよう。2つの micro USB は以下の様なものである。
-----------------------------------------------------------
(a) micro USB (J3) : 写真の赤四角の方。FTDI チップがそばにある。シリアルコンソール用の端子 (先に接続)
(b) micro USB (J16) : 写真の青四角の方。USB OTG(ホスト/クライアント機能)があり,電源供給を受ける事ができる端子(後で接続)
-----------------------------------------------------------
micro USB (J3) は,USBシリアル変換チップに接続され、シリアルコンソール用の端子であり,ここにキーボードやコンソールをつなぐイメージとなる。 ホストコンピュータにつなぐと USB Serial Port(Windows の場合) と認識され,この端子を通じてシリアル通信 (いわゆる tty 接続) で Edison に接続できる。
micro USB (J16) は,USB OTG(ホスト/クライアント機能)があるため, ホストコンピューターにつなぐとホストコンピューター側からは USB メモリがつながれたように見える。 さらに,ホストコンピュータからは Intel Edison Virtual Com Port (Windows の場合) として認識される。 そのため,Arduino IDE からスケッチを書き込む時は,この micro USB (J16) を使うことになる。
他の電源が供給されていなければ,このラインをつなぐと Edison が起動する。
この micro USB 端子は,スイッチで通常サイズの USB 端子と切り替えることが可能である。
J6とJ16は一度に一つしか使用できません。
J6を使い、edisonをホストとして利用したい場合は、PCにJ16接続しても認識できず、充電はできなくて、
充電用コネクターから電源供給する必要があります。
J6:edisonをホストとしてしかつかえない。USBカメラと接続できる。 USBキーボードは使えるかな?
J16:edisonをクライアントとしてしかつかえない。
上にも書いたが,2つの micro USB は,micro USB (J3) を先に接続してから,micro USB (J16) を接続して Edison を起動する方がよい(後からでも壊れはしなかったが…)。 2つの micro USB コネクターをホストコンピューターにつなぐと,Edison が起動し,Edison 上の LED が点灯する。 Edison 上には3つの LED があるが,そのうちの DS1 がまず点灯し,その後 DS1 が消えて DS2 が光る。 そして最終的に DS1 と DS2 が点灯した状態になれば,Edison は起動完了である。 その際,micro USB (J16) を通じて,ホストコンピューターのデスクトップ上に Edison が外部記憶装置として表示されるはずである。
2. シリアル通信で Edison にログインしてみる
micro USB (J3) を使ったシリアル通信は,多少コツが必要である。
Edison の起動後に「コントロールパネル」の中の「デバイスマネージャー」を開き,「ポート(COMとLPT)」の中身を表示させると(Windows の場合), そこに USB Serial Port が表示されるはずである(Intel Edison Virtual Com Port ではないので注意)。 このポートの番号(COMxxと表示される)は,状況によっていろいろと変わる。 そこで PuTTY などの通信ソフトで,当該の COMxx に対して,速度「115200」で「Serial」通信で接続する。 (詳しくは Flashing Edison (wired) - Windows の「Step 1 – Connecting Edison」に書いてある)
Macintosh の場合は,「ターミナル」を起動して,「$ screen /dev/cu.usbserial-xxxxxxx 115200 -L」(xxxxxxx は固有の番号であり,cu.usbserial の後にタブで補完すれば勝手に教えてくれる)と入力するとシリアル通信での接続ができる。 (詳しくは Flashing Edison (wired) - Mac の「Step 1 – Connecting Edison」に書いてある)
シリアル通信で接続できれば,リターンキーを2回押すとログイン・プロンプトが表示される。 そこで「root」(+ enter キー)と入力し,カラのパスワード(パスワード入力なしで enter キー押す)を入れると,Edison にログインできるはずである。
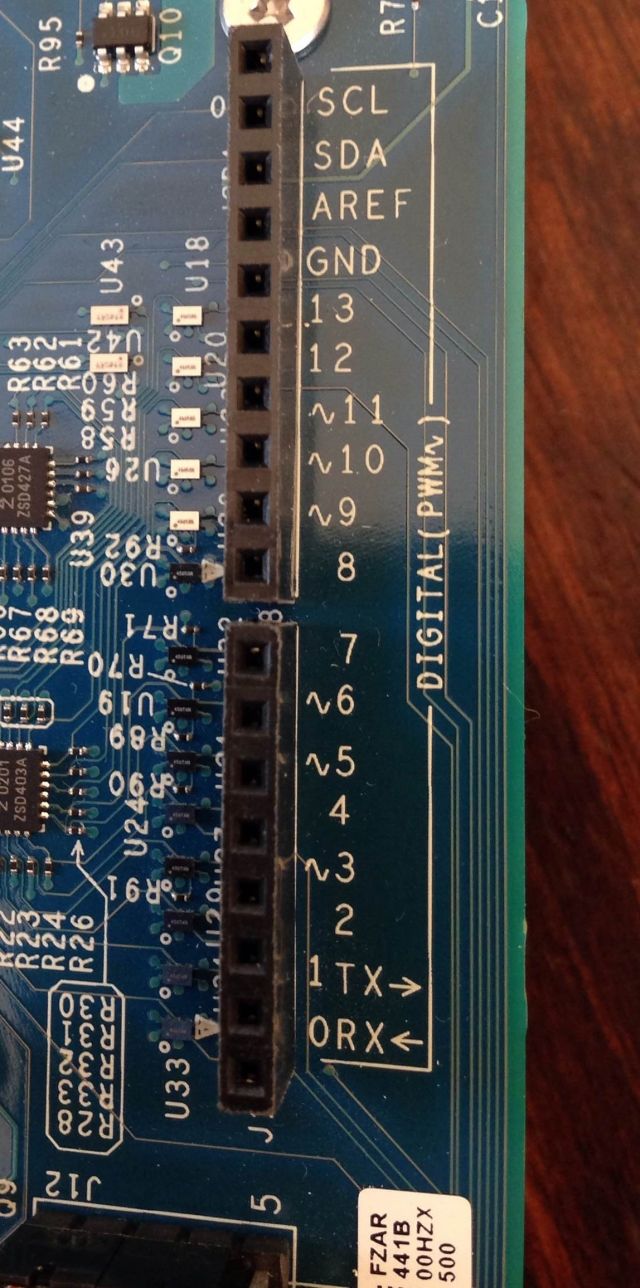
UARTシリアル
0, 1の横にはRX←, TX→という表記があります。これらの端子は、UART (Universal Asynchronous Receiver Transmitter) という規格でデバイスとシリアル通信をするためのものです。
ここまでデバイスとの通信手段は、その時その時のピンの電圧を読み取り、その値1つが意味を成すデータでした。
シリアル通信は、連続する値の変化の仕方にルールと意味を与えて、もっと複雑なデータをやり取りするためのものです。
ちなみにRXは受信、TXは送信の端子です。
相手機器のRXには自分のTXを、相手のTXには自分のRXを繋ぐ形になります。
ただし、これらのシリアル端子は、USBとPCを繋いだ際に利用される経路と共通なので、
PCとシリアル通信をしている時は、0及び1を使うことはできないようです。
⇒PCとedisonのJ3を接続している場合は、pin0とpin1は利用できないということなの?
It provides 2 UART Controllers : UART 1 to Arduino digital pins 0 and 1; UART 2 to a micro USB device connector(J3に繋がっている?); and a USB OTG port that can be switched between a second micro USB device connector or standard size USB host Type-A connector
⇒2つのUARTコントラーは独立しているの?それでも同時には一つしかつかえないの?
UARTも2個ある。ターミナル使いながら、何か機器をつなげられるようです。
rasberrypiのようにシリアルケーブルで接続をためしてみたが、UART1(0RX,1TX,GND)では同じシリアルケーブルでも
macbookとは接続できないようです。
J3でシリアルコンソールで接続:
Poky (Yocto Project Reference Distro) 1.7.2 edison ttyMFD2
edison login: root
root@edison:~# ⇒初期パスワードがありません。
シリアル通信:
Serial ⇒edisonボードのJ16
Name: “Multi-gadget" or “Firmware Programming" or "Serial console" or "OTG" port.
Location: USB-micro connector near center of Arduino board.
Arduino SW name: Serial
Linux name: /dev/ttyGS0
This is the port you use to program your Edison/Arduino, and also the default port for the Serial console inside the Arduino IDE. If the correct drivers are installed, this port also provides access to a USB storage partition and an RNDIS network interface (hence the name “multi-gadget"). When using the Arduino adapter board, this port is only active when SW1 is set to “device" mode, that is, the position closest to the multi-gadget port connector.
Serial1
Name: UART1, the general-purpose TTL-level port (Arduino shield compatibility).
Location: Pins 0 (RX) and 1 (TX) on the Arduino shield interface headers.
Arduino SW name: Serial1
Linux name: /dev/ttyMFD1
This is the port that is exposed to an Arduino shield on pins 0 and 1, creating a simple 5V TTL interface to an external device.
Serial2⇒ J3
Name: UART2, “Linux kernel debug" or “debug spew" port.
Location: USB-micro connector near edge of Arduino board.
Arduino SW name: Serial2
Linux name: /dev/ttyMFD2
This is a very useful port to connect to for debugging, especially when trying to isolate boot problems. The kernel generates its debug “spew" to this port at 115,200 baud. I find it useful to always have a PuTTY terminal console connected to this. When the Serial2 object is initialized with Serial2.begin(), the kernel's access to the port is removed, and the sketch is given control until it calls Serial2.end().
Virtual ports⇒J6 usb type A
Name: VCP or “Virtual communications port". (Appears only when Serial-over-USB device connected.)
Location: Big type “A" USB port nearest the Arduino power connector.
Arduino SW name: not supported by default but see below*
Linux name: /dev/ttyACMx or /dev/ttyUSBx or ?
On the Arduino adapter this port appears only when a suitable device is plugged into the “A" USB port and the appropriate drivers are loaded and SW1 is set to “host" mode, that is, the position closest that port.
If you have a USB hub attached here, you can plug in multiple serial-over-usb devices to get multiple ports.
edison側へsshでログイン
[root@edison1_pepper:~]$ lsal /dev/tty
tty tty11 tty15 tty19 tty22 tty26 tty3 tty33 tty37 tty40 tty44 tty48 tty51 tty55 tty59 tty62 tty9 ttyMFD2
tty0 tty12 tty16 tty2 tty23 tty27 tty30 tty34 tty38 tty41 tty45 tty49 tty52 tty56 tty6 tty63 ttyGS0 ttyPTI0
tty1 tty13 tty17 tty20 tty24 tty28 tty31 tty35 tty39 tty42 tty46 tty5 tty53 tty57 tty60 tty7 ttyMFD0 ttyPTI1
tty10 tty14 tty18 tty21 tty25 tty29 tty32 tty36 tty4 tty43 tty47 tty50 tty54 tty58 tty61 tty8 ttyMFD1 ttymcu0
⇒edison側では電源コネクター以外は何もUSB接続していな状態でも上記のttyGS0,ttyMFD2,ttyMFD1が表示される。
steps to set up serial communication with your board. Serial communication gives you access to the Yocto-built Linux* operating system running on your board. Once you're connected, you can use Linux commands to change the hostname and password of your board, set up a Wi-Fi* connection, flash you board's firmware, and more.
macbookから:
%lsal /dev/tty.usbserial-AI022S8R
1535 crw-rw-rw- 1 root wheel - 17, 10 3 22 16:55:55 2016 /dev/tty.usbserial-AI022S8R
%lsal /dev/cu.usbserial-*
1533 crw-rw-rw- 1 root wheel - 17, 11 3 22 16:55:55 2016 /dev/cu.usbserial-AI022S8R
Connect to the USB serial device using the Terminal screen utility by entering the command:
screen -L /dev/cu.usbserial-AI022S8R 115200
Saving Environment to MMC...
Writing to redundant MMC(0)... done
Flashing already done...
GADGET DRIVER: usb_dnl_dfu
#
DFU complete CRC32: 0xb98db2f8
DOWNLOAD ... OK
Ctrl+C to exit ...
Note: Adding –L to the command, as shown above, turns on output logging so you can see what the result of your commands are.
To end a session in Screen type Ctrl + A and then Ctrl + K to kill the session. You will be prompted to end the session.
U-Boot 2014.04 (Jun 19 2015 - 12:05:55)
Watchdog enabled
DRAM: 980.6 MiB
MMC: tangier_sdhci: 0
In: serial
Out: serial
Err: serial
Hit any key to stop autoboot: 0
Target:blank
Partitioning already done...
Flashing already done...
GADGET DRIVER: usb_dnl_dfu
reading vmlinuz
Magic signature found
Kernel command line: "rootwait root=PARTUUID=012b3303-34ac-284d-99b4-34e03a2335f4 rootfstype=ext4 console=ttyMFD2 earlyprintk=ttyMFD2,keep loglevel=4 g_multi.ethernet_config=cdc systemd.unit=multi-user.target hardware_id=00 g_multi.iSerialNumber=895fbb6361ff9818398dc02043da3453 g_multi.dev_addr=02:00:86:da:34:53 platform_mrfld_audio.audio_codec=dummy"
Starting kernel ...
[ 1.602964] snd_soc_sst_platform: Enter:sst_soc_probe
[ 2.006609] pmic_ccsm pmic_ccsm: Error reading battery profile from battid frmwrk
[ 2.015063] pmic_ccsm pmic_ccsm: Battery Over heat exception
[ 2.022203] pmic_ccsm pmic_ccsm: Battery0 temperature outside boundary
[ 2.118025] Kernel panic - not syncing: No init found. Try passing init= option to kernel. See Linux Documentation/init.txt for guidance.
[ 2.118154] CPU: 0 PID: 1 Comm: swapper/0 Not tainted 3.10.17-poky-edison+ #1
[ 2.118218] Hardware name: Intel Corporation Merrifield/BODEGA BAY, BIOS 542 2015.01.21:18.19.48
[ 2.119077] emmc_ipanic: panic notified
[ 2.119115] emmc_ipanic: Crash partition in use!
******************************
PSH KERNEL VERSION: b0182b2b
WR: 20104000
******************************
SCU IPC: 0x800000d0 0xfffce92c
PSH miaHOB version: TNG.B0.VVBD.0000000c
microkernel built 11:24:08 Feb 5 2015
******* PSH loader *******
PCM page cache size = 192 KB
Cache Constraint = 0 Pages
Arming IPC driver ..
Adding page store pool ..
PagestoreAddr(IMR Start Address) = 0x04899000
pageStoreSize(IMR Size) = 0x00080000
*** Ready to receive application ***
U-Boot 2014.04 (Jun 19 2015 - 12:05:55)
Watchdog enabled
DRAM: 980.6 MiB
MMC: tangier_sdhci: 0
In: serial
Out: serial
Err: serial
Hit any key to stop autoboot: 0
Target:blank
Partitioning already done...
Flashing already done...
GADGET DRIVER: usb_dnl_dfu
reading vmlinuz
5434848 bytes read in 134 ms (38.7 MiB/s)
Valid Boot Flag
Setup Size = 0x00003c00
Magic signature found
Using boot protocol version 2.0c
Linux kernel version 3.10.17-poky-edison+ (sys_dswci@tlsndgbuild004) #1 SMP PREEMPT Fri Jun 19 12:06:40 CEST 2015
Building boot_params at 0x00090000
Loading bzImage at address 00100000 (5419488 bytes)
Magic signature found
Kernel command line: "rootwait root=PARTUUID=012b3303-34ac-284d-99b4-34e03a2335f4 rootfstype=ext4 console=ttyMFD2 earlyprintk=ttyMFD2,keep loglevel=4 g_multi.ethernet_config=cdc systemd.unit=multi-user.target hardware_id=00 g_multi.iSerialNumber=895fbb6361ff9818398dc02043da3453 g_multi.dev_addr=02:00:86:da:34:53 platform_mrfld_audio.audio_codec=dummy"
******************************
PSH KERNEL VERSION: b0182b2b
WR: 20104000
******************************
SCU IPC: 0x800000d0 0xfffce92c
PSH miaHOB version: TNG.B0.VVBD.0000000c
microkernel built 11:24:08 Feb 5 2015
******* PSH loader *******
PCM page cache size = 192 KB
Cache Constraint = 0 Pages
Arming IPC driver ..
Adding page store pool ..
PagestoreAddr(IMR Start Address) = 0x04899000
pageStoreSize(IMR Size) = 0x00080000
*** Ready to receive application ***
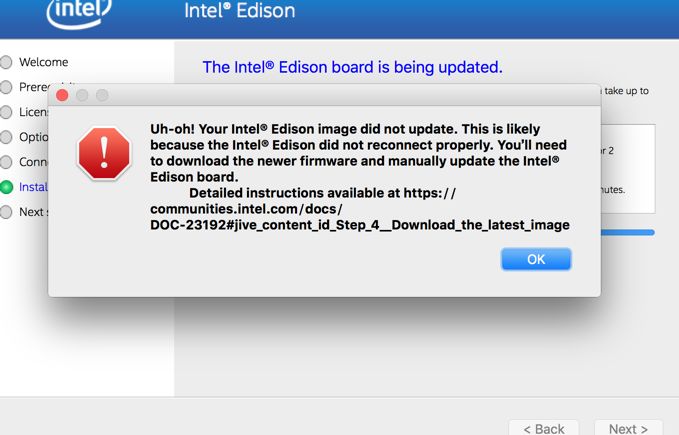
MACからedisonと接続できないようです。
removable deviceとしても表示されなくなった。
2台目のedisonを設定
m_iot_dev_kit_2015.0.026.appを起動して、osアップデートまでまつ(合計10分程度)
macbookから
%ssh root@edison.local
ssh: Could not resolve hostname edison.local: nodename nor servname provided, or not known
⇒一番最初はwifiはまだ設定していないので、ssh root@edison.localで接続できないようです。
%screen /dev/cu.usbserial-A903Z6Y8 115200 -L
Poky (Yocto Project Reference Distro) 1.7.2 edison ttyMFD2
edison login: root
root@edison:~#
root@edison:~# ifconfig
lo Link encap:Local Loopback
inet addr:127.0.0.1 Mask:255.0.0.0
inet6 addr: ::1/128 Scope:Host
UP LOOPBACK RUNNING MTU:65536 Metric:1
RX packets:0 errors:0 dropped:0 overruns:0 frame:0
TX packets:0 errors:0 dropped:0 overruns:0 carrier:0
collisions:0 txqueuelen:0
RX bytes:0 (0.0 B) TX bytes:0 (0.0 B)
usb0 Link encap:Ethernet HWaddr 02:00:86:55:e2:9d
inet addr:192.168.2.15 Bcast:192.168.2.255 Mask:255.255.255.0
inet6 addr: fe80::86ff:fe55:e29d/64 Scope:Link
UP BROADCAST MULTICAST MTU:1500 Metric:1
RX packets:0 errors:0 dropped:0 overruns:0 frame:0
TX packets:0 errors:0 dropped:0 overruns:0 carrier:0
collisions:0 txqueuelen:1000
RX bytes:0 (0.0 B) TX bytes:0 (0.0 B)
%ssh root@192.168.2.15
^C
outanwang@mac-iot-group ~
%ping 192.168.11.15
PING 192.168.11.15 (192.168.11.15): 56 data bytes
Request timeout for icmp_seq 0
Request timeout for icmp_seq 1
Request timeout for icmp_seq 2
⇒なんかnetworkに接続しているように見えるが、何故かsshもpingも接続できないようです。
root@edison:~# uname -a
Linux edison 3.10.17-poky-edison+ #1 SMP PREEMPT Fri Jun 19 12:06:40 CEST 2015 i686 GNU/Linux
root@edison:~# cat /etc/version
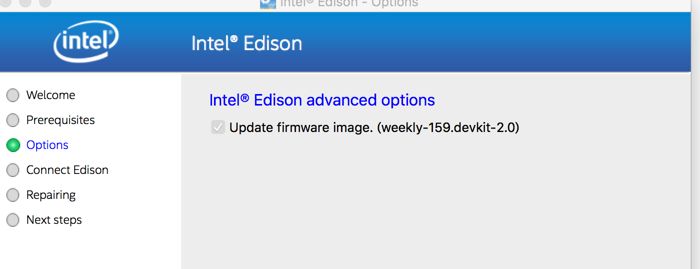
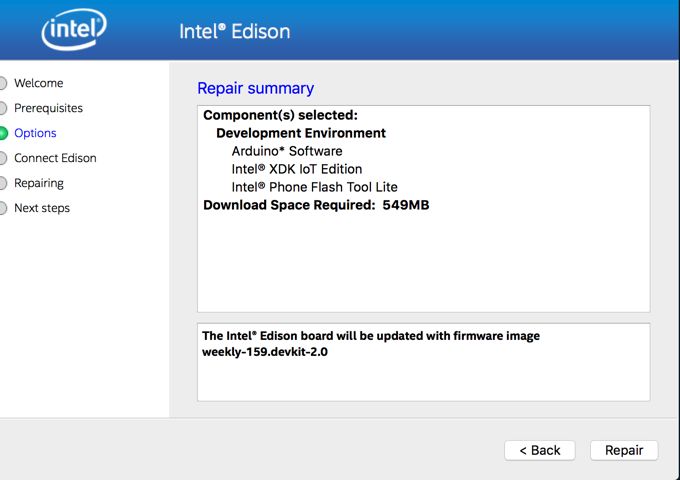
weekly-159.devkit-2.0
root@edison:~# configure_edison --password
Configure Edison: Device Password
Enter a new password (leave empty to abort)
This will be used to connect to the access point and login to the device.
Password: ******
Please enter the password again: ******
The device password must be between 8 and 63 characters long. Please try again.
→nexwaypep
wifiネットワークやhostnameも合わせて設定
root@edison:~# configure_edison --wifi
Configure Edison: WiFi Connection
Scanning: 1 seconds left
0 : Rescan for networks
1 : Exit WiFi Setup
14 : outan-2.4
15 : outan-5
Enter 0 to rescan for networks.
Enter 1 to exit.
Enter 2 to input a hidden network SSID.
Enter a number between 3 to 15 to choose one of the listed network SSIDs: 15
Is outan-5 correct? [Y or N]: y
Password must be between 8 and 63 characters.
What is the network password?: ***********
Initiating connection to outan-5. Please wait...
Attempting to enable network access, please check 'wpa_cli status' after a minute to confirm.
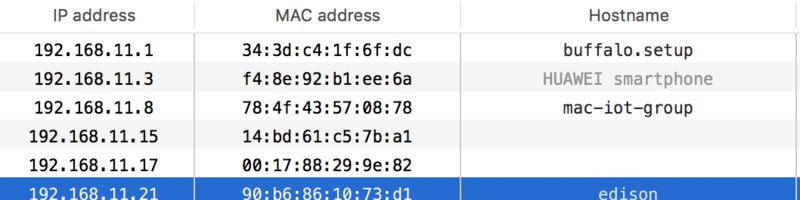
Done. Please connect your laptop or PC to the same network as this device and go to http://192.168.11.21 or http://edison.local in your browser. ⇒wifi設定完了後、はじめてedison.localが利用できるようになるということ。

ブラウザから直接IPあるいはedison1_pepper.localではアクセスできました。
ネットワークの情報(ssid,パスワードなど)は以下のファイルに保存される。
[root@edison1_pepper:~]$ cat /etc/wpa_supplicant/wpa_supplicant.conf
ctrl_interface=/var/run/wpa_supplicant
ctrl_interface_group=0
config_methods=virtual_push_button virtual_display push_button keypad
update_config=1
fast_reauth=1
device_name=Edison
manufacturer=Intel
model_name=Edison
network={
ssid="JKHELP02"
key_mgmt=WPA-PSK
pairwise=CCMP TKIP
group=CCMP TKIP WEP104 WEP40
eap=TTLS PEAP TLS
psk="nexway.1234"
}
network={
ssid="palau"
key_mgmt=WPA-PSK
pairwise=CCMP TKIP
group=CCMP TKIP WEP104 WEP40
eap=TTLS PEAP TLS
psk="nex04893"
}
network={
ssid="outan"
key_mgmt=WPA-PSK
pairwise=CCMP TKIP
group=CCMP TKIP WEP104 WEP40
eap=TTLS PEAP TLS
psk="wadeou_1598"
}
root@edison:~# configure_edison --version
159.devkit
root@edison:~# configure_edison --latest-version
146
→最新のバージョンは現在のバージョンの数字より小さいのはあり得るか?
root@edison:~# ifconfig
lo Link encap:Local Loopback
inet addr:127.0.0.1 Mask:255.0.0.0
inet6 addr: ::1/128 Scope:Host
UP LOOPBACK RUNNING MTU:65536 Metric:1
RX packets:0 errors:0 dropped:0 overruns:0 frame:0
TX packets:0 errors:0 dropped:0 overruns:0 carrier:0
collisions:0 txqueuelen:0
RX bytes:0 (0.0 B) TX bytes:0 (0.0 B)
usb0 Link encap:Ethernet HWaddr 02:00:86:c3:12:ed
inet addr:192.168.2.15 Bcast:192.168.2.255 Mask:255.255.255.0
inet6 addr: fe80::86ff:fec3:12ed/64 Scope:Link
UP BROADCAST RUNNING MULTICAST MTU:1500 Metric:1
RX packets:472 errors:0 dropped:0 overruns:0 frame:0
TX packets:151 errors:0 dropped:0 overruns:0 carrier:0
collisions:0 txqueuelen:1000
RX bytes:118636 (115.8 KiB) TX bytes:32026 (31.2 KiB)
wlan0 Link encap:Ethernet HWaddr 90:b6:86:10:73:d1
inet addr:192.168.11.21 Bcast:192.168.11.255 Mask:255.255.255.0
→usb0にもIPがあるのはどういことでしょうかね。
Step 5: Set up your IDE
Now that you have set up your Intel® Edison board, you can get started programming your board. You chose your programming language and IDE For next steps to get started with your preferred language, choose the appropriate link below:
- For Arduino: Arduino*
- For JavaScript*: Intel® XDK IoT Edition
- For C/C++: Eclipse* for C/C++
- For Java*: Eclipse* for Java
opkgの設定:
root@edison:/etc/opkg# ls -al
drwxr-xr-x 2 root root 4096 Sep 17 2015 .
drwxr-xr-x 31 root root 4096 Jun 19 2015 ..
-rw-r--r-- 1 root root 94 Jun 19 2015 arch.conf
-rw-r--r-- 1 root root 0 Jun 19 2015 base-feeds.conf
-rw-r--r-- 1 root root 58 Sep 17 2015 iotkit.conf
-rw-r--r-- 1 root root 791 Jun 19 2015 opkg.conf
root@edison:/etc/opkg# cat iotkit.conf
src iotkit http://iotdk.intel.com/repos/2.0/intelgalactic
root@edison:/etc/opkg# cat opkg.conf
# Enable GPGME signature
# option check_signature 1
# Offline mode (for use in constructing flash images offline)
#option offline_root target
dest root /
lists_dir ext /var/lib/opkg
tee /etc/opkg/base-feeds.conf << _EOF_ >/dev/null
_EOF_
tee /etc/opkg/intel-iotdk.conf << _EOF_ >/dev/null
_EOF_
root@edison:/etc/opkg# opkg update ⇒全部の新packageを取得する。
Downloading http://repo.opkg.net/edison/repo/all/Packages.gz.
Inflating http://repo.opkg.net/edison/repo/all/Packages.gz.
Updated list of available packages in /var/lib/opkg/all.
Downloading http://repo.opkg.net/edison/repo/edison/Packages.gz.
Inflating http://repo.opkg.net/edison/repo/edison/Packages.gz.
Updated list of available packages in /var/lib/opkg/edison.
Downloading http://repo.opkg.net/edison/repo/core2-32/Packages.gz.
Inflating http://repo.opkg.net/edison/repo/core2-32/Packages.gz.
Updated list of available packages in /var/lib/opkg/core2-32.
Downloading http://iotdk.intel.com/repos/1.1/iotdk/all/Packages.
Updated list of available packages in /var/lib/opkg/intel-all.
Downloading http://iotdk.intel.com/repos/1.1/intelgalactic/Packages.
Updated list of available packages in /var/lib/opkg/intel-iotdk.
Downloading http://iotdk.intel.com/repos/1.1/iotdk/quark/Packages.
Updated list of available packages in /var/lib/opkg/intel-quark.
Downloading http://iotdk.intel.com/repos/1.1/iotdk/i586/Packages.
Updated list of available packages in /var/lib/opkg/intel-i586.
Downloading http://iotdk.intel.com/repos/1.1/iotdk/x86/Packages.
Updated list of available packages in /var/lib/opkg/intel-x86.
Downloading http://iotdk.intel.com/repos/2.0/intelgalactic/Packages.
Updated list of available packages in /var/lib/opkg/iotkit.
root@edison:/etc/opkg# opkg list-upgradable
kernel-module-gspca-main - 1.0-r2 - 3.10.17-r0
kernel-module-test-nx - 1.0-r2 - 3.10.17-r0
kernel-modules - 1.0-r2 - 3.10.17-r0
kernel-module-u-serial - 1.0-r2 - 3.10.17-r0
kernel-module-videobuf2-memops - 1.0-r2 - 3.10.17-r0
kernel-module-cp210x - 1.0-r2 - 3.10.17-r0
kernel-module-g-multi - 1.0-r2 - 3.10.17-r0
kernel-module-videobuf2-vmalloc - 1.0-r2 - 3.10.17-r0
kernel-module-usb-f-acm - 1.0-r2 - 3.10.17-r0
kernel-module-uvcvideo - 1.0-r2 - 3.10.17-r0
mraa - 0.8.0 - 0.9.0
kernel-module-bcm-bt-lpm - 1.0-r2 - 3.10.17-r0
kernel-module-mac80211 - 1.0-r2 - 3.10.17-r0
nodejs-npm - 0.10.38-r0 - 0.12.7-r1
nodejs-dev - 0.10.38-r0 - 0.12.7-r1
kernel-module-aufs - 1.0-r2 - 3.10.17-r0
upm - 0.4.0 - 0.4.1
nodejs - 0.10.38-r0 - 0.12.7-r1
kernel-module-iio-trig-sysfs - 1.0-r2 - 3.10.17-r0
kernel-module-libcomposite - 1.0-r2 - 3.10.17-r0
kernel-module-videobuf2-core - 1.0-r2 - 3.10.17-r0
root@edison:/etc/opkg# opkg upgrade ⇒すべてのパッケージをバージョンアップするとスペースがたりない。
Upgrading kernel-module-gspca-main from 1.0-r2 to 3.10.17-r0 on root.
Downloading http://repo.opkg.net/edison/repo/edison/kernel-module-gspca-main_3.10.17-r0_edison.ipk.
Installing kernel-3.10.17-yocto-standard (3.10.17-r0) on root
Collected errors:
* copy_file_chunk: write: No space left on device.
root@edison:/etc/opkg# df
Filesystem 1K-blocks Used Available Use% Mounted on
/dev/root 1473344 602808 785056 43% /
devtmpfs 491272 0 491272 0% /dev
tmpfs 491560 0 491560 0% /dev/shm
tmpfs 491560 524 491036 0% /run
tmpfs 491560 0 491560 0% /sys/fs/cgroup
systemd-1 5942 5942 0 100% /boot
tmpfs 491560 4 491556 0% /tmp
systemd-1 1337936 2056 1319496 0% /home
tmpfs 491560 0 491560 0% /var/volatile
/dev/mmcblk0p5 1003 19 913 2% /factory
/dev/mmcblk0p10 1337936 2056 1319496 0% /home
/dev/mmcblk0p7 5942 5942 0 100% /boot
/boot容量の拡張
/boot下を一時退避させて再パーティションすると容量が増えます。
mount /boot
mkdir /tmp/boot
mv /boot/* /tmp/boot
umount /boot
mkfs.vfat /dev/mmcblk0p7
mount /boot
cp -a /tmp/boot/* /boot
root@edison:/etc/opkg# df
Filesystem 1K-blocks Used Available Use% Mounted on
/dev/root 1473344 602808 785056 43% /
devtmpfs 491272 0 491272 0% /dev
tmpfs 491560 0 491560 0% /dev/shm
tmpfs 491560 524 491036 0% /run
tmpfs 491560 0 491560 0% /sys/fs/cgroup
systemd-1 32686 5942 26744 18% /boot
tmpfs 491560 5952 485608 1% /tmp
systemd-1 1337936 2056 1319496 0% /home
tmpfs 491560 0 491560 0% /var/volatile
/dev/mmcblk0p5 1003 19 913 2% /factory
/dev/mmcblk0p10 1337936 2056 1319496 0% /home
/dev/mmcblk0p7 32686 5942 26744 18% /boot
時刻合わせ
タイムゾーンをUTCから東京に変更します。
# timedatectl set-timezone Asia/Tokyo
root@edison:/etc/opkg# date
Wed Mar 23 04:55:01 UTC 2016
root@edison:/etc/opkg# timedatectl set-timezone Asia/Tokyo
root@edison:/etc/opkg# date
Wed Mar 23 13:57:18 JST 2016
gitのインストール
setuptoolsのインストール
pipのインストール
easy_install pip
root@edsion1_pepper:/etc/opkg# pip list
PIL (1.1.7)
pip (8.1.1)
setuptools (20.3.1)
smart (1.4.1)
/usr/lib/python2.7/site-packages/pip-8.1.1-py2.7.egg/pip/_vendor/requests/packages/urllib3/util/ssl_.py:315: SNIMissingWarning: An HTTPS request has been made, but the SNI (Subject Name Indication) extension to TLS is not available on this platform. This may cause the server to present an incorrect TLS certificate, which can cause validation failures. For more information, see https://urllib3.readthedocs.org/en/latest/security.html#snimissingwarning.
SNIMissingWarning
/usr/lib/python2.7/site-packages/pip-8.1.1-py2.7.egg/pip/_vendor/requests/packages/urllib3/util/ssl_.py:120: InsecurePlatformWarning: A true SSLContext object is not available. This prevents urllib3 from configuring SSL appropriately and may cause certain SSL connections to fail. For more information, see https://urllib3.readthedocs.org/en/latest/security.html#insecureplatformwarning.
InsecurePlatformWarning
root@edsion1_pepper:/etc/opkg# python --version
Python 2.7.3
root@edsion1_pepper:~# node --version
v0.12.7
root@edsion1_pepper:~# node
> var m = require('mraa');
Error: Module did not self-register.
at Error (native)
at Module.load (module.js:355:32)
at Function.Module._load (module.js:310:12)
at Module.require (module.js:365:17)
at require (module.js:384:17)
at repl:1:9
at REPLServer.defaultEval (repl.js:132:27)
at bound (domain.js:254:14)
at REPLServer.runBound [as eval] (domain.js:267:12)
at REPLServer. (repl.js:279:12)
root@edsion1_pepper:/etc/opkg# vi intel-iotdk.conf
src intel-all http://iotdk.intel.com/repos/3.0/iotdk/all
src intel-iotdk http://iotdk.intel.com/repos/3.0/intelgalactic/opkg/i586
src intel-quark http://iotdk.intel.com/repos/3.0/iotdk/quark
src intel-i586 http://iotdk.intel.com/repos/3.0/iotdk/i586
src intel-x86 http://iotdk.intel.com/repos/3.0/iotdk/x86
opkg update
root@edsion1_pepper:/etc/opkg# opkg upgrade mraa
Upgrading mraa from 0.9.0 to 0.9.6 on root.
Downloading http://iotdk.intel.com/repos/3.0/intelgalactic/opkg/i586//mraa_0.9.6_i586.ipk.
Removing obsolete file /usr/lib/java/libmraajava.so.
Removing obsolete file /usr/lib/libmraa.so.0.9.0.
Configuring mraa.
root@edsion1_pepper:/etc/opkg# opkg upgrade upm
Upgrading upm from 0.4.1 to 0.5.1-r0 on root.
root@edsion1_pepper:/etc/opkg# node --version
v0.12.7
root@edsion1_pepper:/etc/opkg# node
> var m = require('mraa')
Error: Module did not self-register.
at Error (native)
at Module.load (module.js:355:32)
at Function.Module._load (module.js:310:12)
at Module.require (module.js:365:17)
at require (module.js:384:17)
at repl:1:9
at REPLServer.defaultEval (repl.js:132:27)
at bound (domain.js:254:14)
at REPLServer.runBound [as eval] (domain.js:267:12)
at REPLServer. (repl.js:279:12)
→node.jsバージョンの問題らしい。
node.jsのバージョンをv0.10.44に戻せば解決できる。
mraaやupmのバージョンを上げても問題なさそうです。
git 初期設定用shell script:
configure_edison --setup後、ネットワークに参加した状態で実行
SHELL設定:
root@edison1_pepper:~# git clone git@github.com:outan/dotfiles.git
Cloning into 'dotfiles'...
The authenticity of host 'github.com (192.30.252.131)' can't be established.
RSA key fingerprint is 16:27:ac:a5:76:28:2d:36:63:1b:56:4d:eb:df:a6:48.
Are you sure you want to continue connecting (yes/no)? yes
Warning: Permanently added 'github.com,192.30.252.131' (RSA) to the list of known hosts.
Permission denied (publickey).
fatal: Could not read from remote repository.
Please make sure you have the correct access rights
and the repository exists.
root@edison1_pepper:~/.ssh# scp outannexway@192.168.11.14:~/.ssh/* ./
root@edison1_pepper:~/.ssh# ls -al
drwx------ 2 root root 4096 Mar 25 09:40 .
drwxr-xr-x 5 root root 4096 Mar 25 09:30 ..
-rw-r--r-- 1 root root 400 Mar 25 09:39 authorized_keys
-rw-r--r-- 1 root root 2032 Mar 25 09:39 config
-rw------- 1 root root 604 Mar 25 09:39 config_yamashita
-r-------- 1 root root 1692 Mar 25 09:39 dennil.pem
-rw------- 1 root root 1692 Mar 25 09:39 honban_wait_privatekey.txt
-rw-r--r-- 1 root root 1679 Mar 25 09:39 id_boot2docker
-rw-r--r-- 1 root root 399 Mar 25 09:39 id_boot2docker.pub
-rw------- 1 root root 1679 Mar 25 09:39 id_rsa
-rw------- 1 root root 400 Mar 25 09:39 id_rsa.pub
-rw------- 1 root root 1692 Mar 25 09:39 n2dev.pem
-rw------- 1 root root 1692 Mar 25 09:39 n2production.pem
-rw------- 1 root root 400 Mar 25 09:39 nexlink@192.168.143.3
-rw------- 1 root root 1696 Mar 25 09:39 nexlnk2RC.pem
-rw------- 1 root root 1692 Mar 25 09:39 wangdan_ec2.pem
root@edison1_pepper:~/dotfiles# ./symlink.sh
ln: invalid option -- 'F'
BusyBox v1.22.1 (2015-06-19 07:36:41 CEST) multi-call binary.
Usage: ln [OPTIONS] TARGET... LINK|DIR
→どうのようなoptionsが利用できるのかは知らない。
とりあえずFとi optionを削除
ln -fs "$PWD/$dotfile" "$HOME/$dotfile"
root@edison1_pepper:~/dotfiles# ./symlink.sh
→特にエラーがなかった。
[root@edison1_pepper:~]$ source .bash_profile
-bash: /opt/centos/devtoolset-1.1/enable: No such file or directory
[root@edison1_pepper:~]$ lsal
ls: unrecognized option '--time-style=+%Y-%m-%d %H:%M:%S'
BusyBox v1.22.1 (2015-06-19 07:36:41 CEST) multi-call binary.
Usage: ls [-1AaCxdLHRFplinsehrSXvctu] [-w WIDTH] [FILE]..
→赤の部分を削除する。
[root@edison1_pepper:~]$ lsal
14 lrwxrwxrwx 1 root root 29 Mar 25 10:22 .agignore -> /home/root/dotfiles/.agignore
139 lrwxrwxrwx 1 root root 28 Mar 25 10:22 .aliases -> /home/root/dotfiles/.aliases
15 -rw------- 1 root root 2.1K Mar 25 10:14 .bash_history
140 lrwxrwxrwx 1 root root 33 Mar 25 10:22 .bash_profile -> /home/root/dotfiles/.bash_profile
142 lrwxrwxrwx 1 root root 27 Mar 25 10:22 .bashrc -> /home/root/dotfiles/.bashrc
18 drwx------ 3 root root 4.0K Mar 24 16:57 .cache/
154 lrwxrwxrwx 1 root root 27 Mar 25 10:22 .editrc -> /home/root/dotfiles/.editrc
195 lrwxrwxrwx 1 root root 40 Mar
[root@edison1_pepper:~]$ vi
-bash: vim: command not found
[root@edison1_pepper:~]$ which vi
/bin/vi
[root@edison1_pepper:~]$ cat .bash_profile
if [ -f ~/.aliases ]; then
. ~/.aliases
fi
#.bashrc中で.aliasesの設定と重複の場合に、.bashrcを優先するために、設定を.aliasesの下に移動
if [ -f ~/.bashrc ] ; then
. ~/.bashrc
fi
export PATH="/usr/local/bin:$PATH:/usr/local/sbin"
export PATH=$PATH:~/bin
export PATH=$PATH:/sbin
export PATH=$PATH:/usr/sbin
export PATH=$PATH:/binを追加
[root@edison1_pepper:~]$ vi
-bash: vim: command not found
[root@edison1_pepper:~]$ echo $PATH
/usr/local/bin:/usr/local/bin:/usr/local/bin:/usr/local/bin:/usr/bin:/bin:/usr/local/sbin:/usr/sbin:/sbin:/usr/local/sbin:/home/root/bin:/sbin:/usr/sbin:/usr/local/sbin:/home/root/bin:/sbin:/usr/sbin:/usr/local/sbin:/home/root/bin:/sbin:/usr/sbin:/bin
[root@edison1_pepper:~]$ ln
BusyBox v1.22.1 (2015-06-19 07:36:41 CEST) multi-call binary.
Usage: ln [OPTIONS] TARGET... LINK|DIR
[root@edison1_pepper:~]$ which ln
/bin/ln
[root@edison1_pepper:~]$ vi
-bash: vim: command not found
[root@edison1_pepper:~]$ which vi
/bin/vi
→良くわからないな。 lnは識別できたけど、何故viは識別できないだろう。
/binをPATHに追加したけど。
[root@edison1_pepper:~]$ lsal /bin/ln
23537 lrwxrwxrwx 1 root root 19 Jun 19 2015 /bin/ln -> /bin/busybox.nosuid*
[root@edison1_pepper:~]$ lsal /bin/vi
9868 lrwxrwxrwx 1 root root 19 Mar 25 10:20 /bin/vi -> /bin/busybox.nosuid*
edisonを再起動
[root@edison1_pepper:~]$ echo $PATH
/usr/bin:/usr/local/bin:/usr/bin:/bin:/usr/local/sbin:/usr/sbin:/sbin:/usr/sbin:/home/root/bin:/sbin:/bin
[root@edison1_pepper:~]$ vi
-bash: vim: command not found
→opkg install vimでインストールした後、vimが実行したら、おかしい現象が発生したので、removeした。
それとは何か関係があるらしい。
vimの文字化けを解消
[root@edison1_pepper:~]$ opkg install vim
Installing vim (7.4.481-r0) on root.
Downloading http://repo.opkg.net/edison/repo/core2-32/vim_7.4.481-r0_core2-32.ipk.
package vim suggests installing diffutils
Configuring vim.
update-alternatives: Linking //bin/vi to /usr/bin/vim
# vi ~/.vimrc
---- vi追記 ----
set encoding=utf-8
set fileencodings=iso-2022-jp,euc-jp,sjis,utf-8
set fileformats=unix,dos,mac
保存したら、設定反映
# source ~/.vimrc
xdk demaonの確認:
[root@edison1_pepper:~]$ ps | grep xdk
292 root 3132 S {xdk-daemon} /bin/sh /opt/xdk-daemon/xdk-daemon
296 root 35964 S /usr/bin/node /opt/xdk-daemon/main.js
309 root 72224 S /usr/bin/node /opt/xdk-daemon/current/appDaemon.js
xdkからedisonに接続する時にはやはりdemaonのupgradeが必要です。

update後、
[root@edison1_pepper:~]$ lsal
141 drwxr-xr-x 4 root root 4.0K Sep 1 2015 xdk-daemon-0.0.37-ia32-node-0.10.x/
212 -rw-r--r-- 1 root root 19.9M Mar 25 11:55 xdk-daemon-0.0.37-ia32-node-0.10.x.tar
→自動的に/home配下にダンロードしたようです。
※demaon アップグレードできない場合は以下を参考にする。
git文字化け解消
git log diffは文字化け
[[1;33mdiff --git a/johnny-five/okashi_box_kosodatemese/main.js b/johnny-five/okashi_box_kosodatemese/main.js[[m
[[1;33mindex f41799b..a0598a1 100644[[m
[[1;33m--- a/johnny-five/okashi_box_kosodatemese/main.js[[m
[[1;33m+++ b/johnny-five/okashi_box_kosodatemese/main.js[[m
[[1;35m@@ -10,7 +10,7 @@[[m [[mboard.on("ready", function() {[[m
var box3 = 0;[[m
var light_num = 0;[[m
var light_limit_opened = 600;[[m
[[7;31m- var light_threshold = 340;[[m
明示的にlessページャを指定することで、エスケープシーケンスが認識されるようにななるはずです。
[root@edison1_pepper:~/workspace_outan/nodejs_edison/johnny-five/okashi_box_kosodatemese]$ less
-bash: /usr/share/vim/vim73/macros/less.sh: No such file or directory
何故かlessはうまく識別できないようです。
しょうがなく、moreに変更
pager = more -c
alias | ag less
alias less='/usr/share/vim/vim73/macros/less.sh’
⇒このaliasを変更すればいいだ。